TS-2000(X) /TS-B2000
Firmware updating procedure |
Last updated : July 28, 2015 |
|
|
|
The TS-2000(X)/B2000 firmware is stored in the main CPU chip which contains a built-in flash ROM.
This manual describes the method of updating the firmware of the TS-2000(X)/B2000.
|
| |
| 1. Requirements |
| 1) |
A personal computer. (IBM PC or compatible) |
 |
|
| 2) |
The firmware updating program. |
| |
This program runs on Windows Vista®, Windows® 7, Windows® 8, or Windows® 8.1 operating system.
About 1MB of free hard drive space is needed to install this program.At least 5MB of memory is required to run this program. |
| |
| Note |
: |
When installing, running and uninstalling this program, you must have administrative privileges. |
|
|
|
| 3) |
An RS-232C straight cable. |
| |
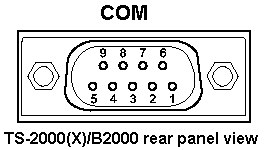
(With D-SUB 9-pin female connector for the TS-2000(X)/B2000 COM connector) |
|
|
| |
 |
|
|
| |
| COM Pin No. |
COM Pin Name
Ref. : Computer |
Function
Ref. : Transceiver |
I/O
Ref. : Transceiver |
| 1 |
NC |
- |
- |
| 2 |
RXD |
Transmit data |
Output |
| 3 |
TXD |
Receive data |
Input |
| 4 |
NC |
- |
- |
| 5 |
GND |
Signal ground |
- |
| 6 |
NC |
- |
- |
| 7 |
RTS |
Receive enable |
Input |
| 8 |
CTS |
Transmit enable |
Output |
| 9 |
NC |
- |
- |
|
|
|
| 2. Firmware updating program installation |
| 1) |
Extract the downloaded file "TS2K_XXX.zip" into a designated folder.("XXX" is a 3-digit numeric version number.) |
|
|
| 2) |
In the designated folder, a folder labeled "TS2K_XXX." will be created. |
3) |
Execute the "Setup.exe" file  within the folder to begin installation. within the folder to begin installation. |
| 4) |
Once installation begins, follow the instructions that appear on the screen. |
|
|
| 3. TS-2000(X)/B2000 baud rate setting |
| 1) |
Press  (Power) to turn the transceiver ON. (Power) to turn the transceiver ON. |
| 2) |
Set the communication baud rate of your TS-2000(X)/B2000 to 9600bps (Menu 56). |
|
|
| 4. Start TS-2000(X)/B2000 firmware updating program |
| 1) |
Start the TS-2000 firmware updating program
[Start]  [Programs] [KENWOOD] [TS-2000 Update] [TS-2000 Update] [Programs] [KENWOOD] [TS-2000 Update] [TS-2000 Update] |
|
|
| 2) |
Select the serial port you will use. |
| |
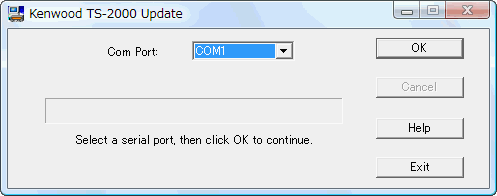 |
|
|
| 3) |
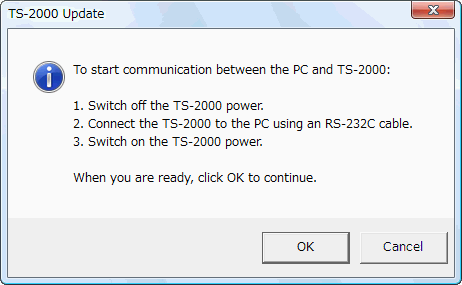
To start communication between the PC and the TS-2000(X)/B2000, click OK.
The following dialog box will appear. |
| |
 |
|
|
| 5. Transceiver recognition steps |
| 1) |
Press(Power)
to turn the transceiver OFF. |
| |
 |
| 2) |
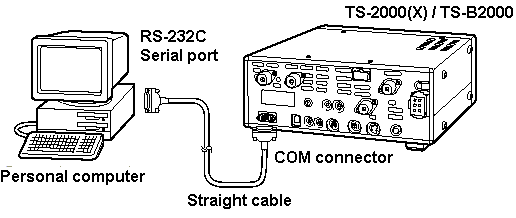
Connect the TS-2000(X)/B2000 to the PC using an RS-232C straight cable as shown above. |
|
|
| 3) |
Press(Power)
to turn the transceiver ON. |
| |
Click OK. |
| |
The following dialog box will appear. |
| |
 |
| |
Note : This transceiver recognition step is required only in the 1st execution after installation. |
|
|
| 6. Firmware writing procedures |
| 1) |
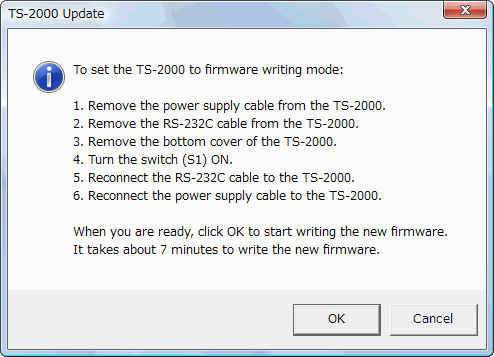
Remove the DC power supply cable from the TS-2000(X)/B2000. |
|
|
| 2) |
Remove the RS-232C cable from the TS-2000(X)/B2000. |
|
|
| 3) |
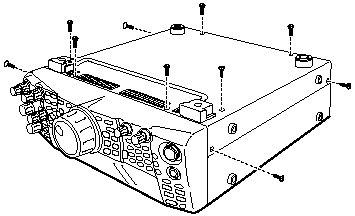
Remove the bottom cover of the TS-2000(X)/B2000. |
| |
 |
|
|
| 4) |
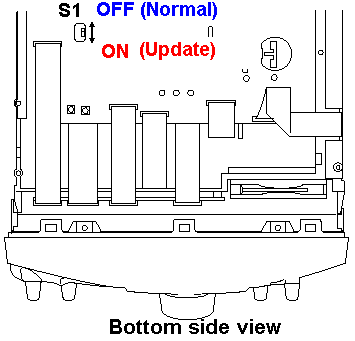
Turn the switch (S1) ON.
The switch is located on the PC board as shown below. |
| |
| Notes : |
1) |
The DC power supply cable must be removed before the switch (S1) is turned ON. |
| |
2) |
Move the tab of the switch (S1) gently;
Rough handling may cause it to break. |
|
|
|
| |
 |
|
|
| 5) |
Reconnect the RS-232C cable to the TS-2000(X)/B2000. |
|
|
| 6) |
Reconnect the DC power supply cable to the TS-2000(X)/B2000. |
| |
| Note |
: |
The transceiver does not turn on any indicators, but it is ready to rewrite firmware.
Do not operate(Power) switch during the firmware writing mode. |
|
|
|
| |
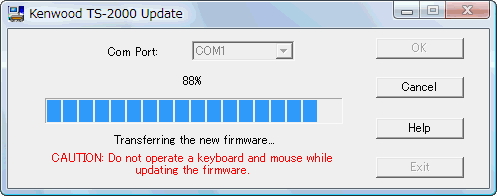
When you are ready, click OK.
The new firmware will be transferred into the main CPU flash ROM.
It takes about 7 minutes to write the new firmware. |
|
|
| |
 |
|
|
| |
 |
|
|
| |
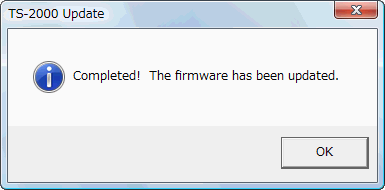
After the firmware writing step is completed, the following confirmation dialog box will appear. |
| |
 |
| |
Click OK. |
| |
The following information dialog box will appear. |
| |
 |
| |
| Notes : |
1) |
Do not operate the power switch of the transceiver during the firmware writing mode. |
| |
2) |
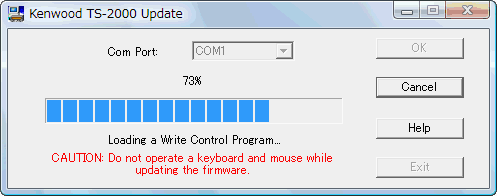
Do not operate a keyboard and mouse while updating the firmware.
(Such as move the dialog box or right click a task bar while updating the firmware.
It may cause a communication error.) |
| |
3) |
Do not worry if the firmware writing step fails for some reason.
(e.g. RS-232C cable has a bad contact or there is an unexpected power failure) |
|
|
|
| |
|
The status of the firmware writing step is backed up on your PC.
Remove and reconnect the power supply cable.
Then repeat the firmware writing step. |
|
|
|
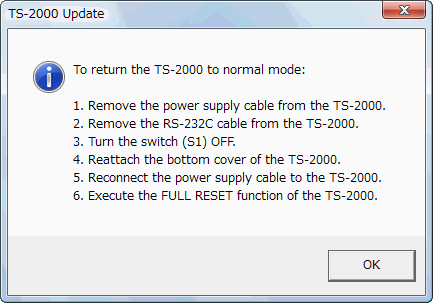
| 7. Post Updating steps |
| 1) |
Remove the power supply cable from the TS-2000(X)/B2000. |
|
|
| 2) |
Remove the RS-232C cable from the TS-2000(X)/B2000. |
|
|
| 3) |
Turn the switch (S1) OFF. |
|
|
| 4) |
Reattach the bottom cover of the TS-2000(X)/B2000. |
|
|
| 5) |
Reconnect the power supply cable to the TS-2000(X)/B2000. |
|
|
| 6) |
Execute the FULL RESET function of the TS-2000(X)/B2000 as follows. |
|
|
| 8. FULL RESET |
|
| a: TS-2000(X) |
| 1) |
Press(Power) to turn the transceiver on while pressing and holding [A=B]. |
| 2) |
"FULL RESET PUSH A=B SW" message will appear. |
| 3) |
Press [A=B] to perform the FULL RESET. |
|
|
| b: TS-B2000 |
| 1) |
Press(Power) to turn the transceiver on. |
| 2) |
Press [Reset] button on the front panel to perform the FULL RESET. |
|
|
| 9. Uninstalling the firmware updating program |
| Select "TS-2000 Update" in "Uninstall a program" in the Control Panel and follow the instructions that appear on the display to uninstall the software. |
|
| Windows is a registered trademark or trademark of Microsoft Corporation in the United States and other countries. |
| Windows Vista is a registered trademark or trademark of Microsoft Corporation in the United States and other countries. |
